 For the last 10 minutes of this lesson we tried to narrow down sounds that we wanted to use in our 2 minute clip. We found three sounds that we would like to use in our clip. One of them is for our indent, one is for a climax and the last one is for a tune that would play throught the whole thing. The reason we have chosen these three sounds is because they all fit into what we wented our clip to sound like. As the clip gets futher on, the pace quickens and we want our soundtrack to reflect that. Throughtout the two minute clip there are going to be flashing images if we can get it to look right on final cut, when this happens we want to music to be obviouly different when they come up, we were thinking maybe a bit of music that would be slightly jumpy.
Friday, 26 February 2010
Garage Band Soundtrack
For the last 10 minutes of this lesson we tried to narrow down sounds that we wanted to use in our 2 minute clip. We found three sounds that we would like to use in our clip. One of them is for our indent, one is for a climax and the last one is for a tune that would play throught the whole thing. The reason we have chosen these three sounds is because they all fit into what we wented our clip to sound like. As the clip gets futher on, the pace quickens and we want our soundtrack to reflect that. Throughtout the two minute clip there are going to be flashing images if we can get it to look right on final cut, when this happens we want to music to be obviouly different when they come up, we were thinking maybe a bit of music that would be slightly jumpy.

Unedited film footage 25/03/10
We filmed this on the 25th February, which was our first filming lesson, so we took a lot of shots that we don't know if we'll use yet. Everything that we filmed went well and looked how we wanted it to look, except for the trail. Obviously we will edit the colorings in the footage in final cut to make it look like it was filmed at night. Also we will edit the color of the blood (ketchup) to make it more obvious and apparent that it is there. The costumes weren't a problem because we planned to wear the clothes we needed to wear for the film that day. When we edit the clip the sound from it will be replaced by our soundtrack which will be made on garage band.
This piece of filming was done on the 26th of February and we were initially planning to film on this date but because we weren't happy with all of the filming we did the previous lesson, we re-did the bit we didn't like, which was the 'blood' trail. We didn't like it the first time becasue it wasn't long enough, the filming was at a consistent height or speed and we thought that we could make it more to what we wanted if we re-did it. The filming was done in exactly the same location to keep consistency.
26th February
Today we went outside again to film the trail for the second time. This time it went much better as we had more of an idea of how we wanted it to look because we had attempted to film it before and we weren't please with the filming that we did. We realised that we wanted the camera to be very close to the 'blood' trail so that you could nocibly see that it was there and we wanted it to be a tracking shot so it felt like the viewer was following the 'blood' trail and it would make them feel excited/nervous to find out what was at the end of it. We needed it to be quite long to build up suspense so the view gets apprehensive about what is going on. The piece of filming that we did is what we wanted in all aspects so we are pleased with the clip. This means that we wont need to redo this part of the two minute clip again, this helps us out because the editing of our clip is gogin to be the hardest thing as we are not completely sure how to do it. We are a bit worried about not being able to see the blood as it isn't a bright red and some of the leaves on the floor are red as it is filmed in a forest and it is that time of year. We are going to solve this by editing the colour balance on final cut. Also, we want to make it look like it was filmed in the dark we will either edit the colour balance or make it black and white on final cut. If we cant achieve this we will get the IT technicion (Ricki) to help us with this effect. If the effect we want can not be achieved, we are not sure how we are going to portray the 'blood' in the way we want it. We may have to try another technique to create the look we want.
1st filming lesson - 25th February


 These images were taken yesterday when we were doing our filming, we had to put ketchup on our faces to make it look like blood, this took a while because there we quite a lot of complications with doing this because the ketchup when everywhere and we had to get it right first time as we didn't have as much ketchup as we wanted so we couldnt be wasteful.
The ketchup trail we did in this lesson didnt go as well as we wanted as we decided as a group that it was done to think, so next time we film, we will redo the 'blood' trail.
Tuesday, 23 February 2010
Practice on Garage band
 We went onto garage band to practice using it and we wanted to find the different sounds we needed for our 2 minute thriller clip. We tried to see if a soundtrack could be created without using traditional instruments. We found that there are many different sound that could fit into our thriller film so it was helpful for when we come to create our soundtrack, we have narrowed down what categories we want to look at. A couple of the categories we are looking to use are 'dark' and 'Intense'.
Female villains

We decided to look at female villains because the main characters in our thriller clip are female. The one we chose to look at in detail was Uma Thurman in Kill Bill as it is a well known film. We thought that it would be a good idea to look at this film because although she does bad things, she does them for a reason and in our clip, you could find out later in the film that the two girls are also doing it for a reason.
 We also looked at Catwoman. Eventhough she is also nothing like our female villains, she still plays the strong role of the villain. She gets possessed by a cat which turns her into the villain whereas the villains in our clip are just sick in the head. The film revolves around what she does which is similar to our film.
Filming call Sheet
We are going to film between the dates of 25th February to 8th of march during our lesson time in the day.
Ben will pick up and bring back the camera and tripod as he is filming.
We will be filming in the forest in the outskirts of the school which is in walking distance from our classroom, and it is not a public location. We have chosen this location because it is rural and quiet enough to suit the thriller setting conventions and the lighting won't matter so much as we will make it darker in final cut.
We will be filming during the day and then making the setting darker in final cut.
Ellie and Leah need to be there for the acting as they play the two girls but as there is no dialogue they do not need to learn a script.
Ben will do all of the filming throughout the film time.
The only prop needed is tomato ketchup for the blood which we can all bring.
Our back up plan for if weather disrupts our filming is to work on soundtrack and editing from the footage we already have. During our filming time we are going to capture the first two minutes of the film. We will cover a wide range of shots and we don't need to cover any sound as the soundtrack will be playing over it the entire time.
Ben will pick up and bring back the camera and tripod as he is filming.
We will be filming in the forest in the outskirts of the school which is in walking distance from our classroom, and it is not a public location. We have chosen this location because it is rural and quiet enough to suit the thriller setting conventions and the lighting won't matter so much as we will make it darker in final cut.
We will be filming during the day and then making the setting darker in final cut.
Ellie and Leah need to be there for the acting as they play the two girls but as there is no dialogue they do not need to learn a script.
Ben will do all of the filming throughout the film time.
The only prop needed is tomato ketchup for the blood which we can all bring.
Our back up plan for if weather disrupts our filming is to work on soundtrack and editing from the footage we already have. During our filming time we are going to capture the first two minutes of the film. We will cover a wide range of shots and we don't need to cover any sound as the soundtrack will be playing over it the entire time.
Thursday, 11 February 2010
11th February - Second filming lesson
Today we have edited our captured image so that there is text showing what kind of shots we will be using. We also wrote about why we did the test footage and how it helped us. For our next lesson we will now be ready to capture our footage for the next lesson. Hopefully we will capture all of our footage in that lesson so that we can concentrate on our editing for our final sequence.
Photos of what we want in our two minute sequence


We took pictures in our first filming lesson to show the areas that we are going to be using and what we need to capture.

We took lots of different shots from different angles to see which would work best.
Thriller test footge.
This footage was filmed on Tuesday afternoon and are all practice shots for our final piece. The purpose of this test footage is to see how long it would take to shoot each shot type and what the best locations for them are. We feel that these shots were successful as we managed to keep the camera steady throughout and they showed off the thriller element well. What we should be aware of: 1. Establishing long shot: make sure the camera is steady and can clearly portray the movement of the girls. 2. Close up floor tracking shot: make sure that the blood trail is easily seen during the shot and that it is the main part of the shot. 3. Ascending tracking shot: make sure that the camera doesn't shake when ascending up the girl's bodies so that the upward transition from the ground to them is smooth. We used these shots as they are probably the most difficult to shoot and so we needed the practice to get them as steady and smooth as possible. Also they show the different range of shots that will be used during our final product and we can get some experience of shooting in the forest.
Tuesday, 9 February 2010
Health and Safety when filming
Health and Safety-
- Be aware of your surroundings
- Get consent
- Don't do anything that a passer by might be offended by
- Be respectful to the public
- Don't film in a dangerous place
- No swearing/children can appear in the film
- You cannot go on the roof of the college
Top Tips for filming
Top tips-
- Lots of shots
- Have a back up plan
- Make sure you film more than you need
- Make sure the tape is in the correct place
- Be clear on what you want to film
- Use your shot lists
- Keep continuity
- Keep your camera steady
9th February- First filming lesson
 Editing Pictures Today we captured some footage and took some practise pictures for our final shot. We then edited it on photoshop. This is our final results. By doing this we have learnt what we need to do for our final photo.
 Friday, 5 February 2010
Breakdown of our Finalised Ideas
Here is a list of what exactly will be in our two minute clip and what will be happening. We have also listed locations, props etc so that it is easier for us to film. We have split it up into sections of ten seconds and tried to guess how long we will show shots for, however when we have our footage it may not exactly follow this plan.
0-10 seconds 5 seconds of this will be our ident with its own music playing in the background. The ident will fade into darkness and the music will fade into the music we will be using for our background music throughout the clip. You will see the floor in the forest for about 3 seconds after the ident has faded out.
10-20 seconds In this section you will see the beginning of the blood trail on the floor and the eerie music has now got a little louder to build up suspense. We will be following the blood for the whole ten seconds along the forst floor. During the 14-20 seconds section, the first credit will appear which will be 'Leah Clark' which will be shown for 3 seconds, then 'Ellie Farrington' will appear afterwards for 3 seconds as well. We will have used tomato ketchup to create the blood for this and our location will be the forest. We will use a tracking shot that slowly starts to zoom in at 15 seconds.
20-30 seconds In this section we will still be using a tracking shot of the blood trail on the floor in the forest, but more credits will be appearing. These will be: 'Produced by Ellie Farrington Leah Clark Ben Whybrow' 'Directed by Ellie Farrington Leah Clark Ben Whybrow' 'Music by Ellie Farrington Leah Clark Ben Whybrow' They will all last for about 3 seconds each. The music will be increasing in volume throughout this period and reaching its full volume by the end of this period.
30-40 seconds In this section we will be using a tracking shot again, filming the blood trail but at 33 seconds you will start to see one each of the girls feet walking along. The girls will be walking through the forest with blood (tomato ketchup) on their feet. They will be wearing black leggins with no shoes. We will still be seeing credits, these will be: 'Editing by Ellie Farrington Leah Clark Ben Whybrow' 'Filming by Ellie Farrington Leah Clark Ben Whybrow' 'Lighting by Ellie Farrington Leah Clark Ben Whybrow' The music will remain at the same pace before becoming more intensive as it reaches the girl's feet.
40-50 seconds In this section we will still be in the forest but there will be no credits now. We will still be using tomato ketchup on the girls feet and on the ground where it has dripped from their hands but the shot will slowly begin to pan up and out so you can see both of the girls feet and you can see part of their legs walking along now. The music will have been playing throughout all this time, gradually becoming more intensive.
50-60 seconds The shot continues to pan up so that you can now see the girls lower backs and you can see that they are holding hands. It will be visible that there is blood (tomato ketchup) on the hands and arms and it will be dripping from them which is where the blood trail has come from. After about 5 seconds, you will begin to see the backs of the girls heads. They will still be walking along in the forest.The music will still be increasing in intensity.
60-70 seconds In this section the shot will switch to a close up of the girls hands with the blood on. It will last for about 4 seconds and then it will zoom out to a long shot of the girls standing still in the middle of the forest. The shot will shake a little to make it more spooky and you will be able to slightly see the blood trail (tomato ketchup). One of the girls will slowly turn her head to look behind her at the camera and will stay in that position until 70 seconds. Along with the soundtrack, extra sound effects will be used during the shaking of the camera to add suspense.
70-80 seconds In this section the shot will switch back to the back of the girls heads, you won't see lower than their shoulders. The forest around will be quite dark still. After 4 seconds of seeing their heads, the girls will both turn their heads, one completely to the side and one only halfway sidewards. You will see blood splattered on only one face, this shot will last for 6 seconds.
80-90 seconds In this section the shot will flash to the same as before but the other girls head will now be fully turned and she will have blood (tomato ketchup) splattered on her face and the other girls face will be clean. This will last for 6 seconds and will switch to a medium close up of the backs of the girls heads again which we will see for 4 seconds. We may make the shot shake a bit here to make it more creepy but until we have experimented with the camera we can't be sure.
90-100 seconds In this section a long shot will show the girls standing in the forest again. It will last for about 3 seconds and will switch to no one standing in the forest for 3 seconds and then it will show the girls standing there again until 100 seconds.
100-110 seconds In this section we will have a close up of the backs of the girls hair and the shot will slightly shake. this will last for about 5 seconds and the music will become quieter until it suddenly switches to an extreme close up shot of the two girls faces where the music will have a loud bang noise and then return to its previous sound. We will see the shot for about 3 seconds then the words 'The Sin' will appear in the middle of the screen which is the title of the film.
110-120 seconds In this section you will see the girls faces and the title both fade out onto a plain blank screen. It will go blank because then the rest of the film would normally continue but because we are only doing the opening sequence, we decided to leave it blank and dark After planning the timing like this, it has given us an idea of how much footage we need to capture to actually create the opening sequence.
When filming we will film more material than needed incase we need to change some of the lengths of the shots e.g turning a 5 second shot into a 3 second shot would make the sequence shorter so another part may need to be made longer to make sure that it meets the marking cryteria by being long enough. We think that the times we have set are realistic and manageable and we think we will have enough time to film all the footage we will need. During the entire sequence there will be no dialogue used at all and the only prop used will be tomato ketchup so that it can be simple but affective.
0-10 seconds 5 seconds of this will be our ident with its own music playing in the background. The ident will fade into darkness and the music will fade into the music we will be using for our background music throughout the clip. You will see the floor in the forest for about 3 seconds after the ident has faded out.
10-20 seconds In this section you will see the beginning of the blood trail on the floor and the eerie music has now got a little louder to build up suspense. We will be following the blood for the whole ten seconds along the forst floor. During the 14-20 seconds section, the first credit will appear which will be 'Leah Clark' which will be shown for 3 seconds, then 'Ellie Farrington' will appear afterwards for 3 seconds as well. We will have used tomato ketchup to create the blood for this and our location will be the forest. We will use a tracking shot that slowly starts to zoom in at 15 seconds.
20-30 seconds In this section we will still be using a tracking shot of the blood trail on the floor in the forest, but more credits will be appearing. These will be: 'Produced by Ellie Farrington Leah Clark Ben Whybrow' 'Directed by Ellie Farrington Leah Clark Ben Whybrow' 'Music by Ellie Farrington Leah Clark Ben Whybrow' They will all last for about 3 seconds each. The music will be increasing in volume throughout this period and reaching its full volume by the end of this period.
30-40 seconds In this section we will be using a tracking shot again, filming the blood trail but at 33 seconds you will start to see one each of the girls feet walking along. The girls will be walking through the forest with blood (tomato ketchup) on their feet. They will be wearing black leggins with no shoes. We will still be seeing credits, these will be: 'Editing by Ellie Farrington Leah Clark Ben Whybrow' 'Filming by Ellie Farrington Leah Clark Ben Whybrow' 'Lighting by Ellie Farrington Leah Clark Ben Whybrow' The music will remain at the same pace before becoming more intensive as it reaches the girl's feet.
40-50 seconds In this section we will still be in the forest but there will be no credits now. We will still be using tomato ketchup on the girls feet and on the ground where it has dripped from their hands but the shot will slowly begin to pan up and out so you can see both of the girls feet and you can see part of their legs walking along now. The music will have been playing throughout all this time, gradually becoming more intensive.
50-60 seconds The shot continues to pan up so that you can now see the girls lower backs and you can see that they are holding hands. It will be visible that there is blood (tomato ketchup) on the hands and arms and it will be dripping from them which is where the blood trail has come from. After about 5 seconds, you will begin to see the backs of the girls heads. They will still be walking along in the forest.The music will still be increasing in intensity.
60-70 seconds In this section the shot will switch to a close up of the girls hands with the blood on. It will last for about 4 seconds and then it will zoom out to a long shot of the girls standing still in the middle of the forest. The shot will shake a little to make it more spooky and you will be able to slightly see the blood trail (tomato ketchup). One of the girls will slowly turn her head to look behind her at the camera and will stay in that position until 70 seconds. Along with the soundtrack, extra sound effects will be used during the shaking of the camera to add suspense.
70-80 seconds In this section the shot will switch back to the back of the girls heads, you won't see lower than their shoulders. The forest around will be quite dark still. After 4 seconds of seeing their heads, the girls will both turn their heads, one completely to the side and one only halfway sidewards. You will see blood splattered on only one face, this shot will last for 6 seconds.
80-90 seconds In this section the shot will flash to the same as before but the other girls head will now be fully turned and she will have blood (tomato ketchup) splattered on her face and the other girls face will be clean. This will last for 6 seconds and will switch to a medium close up of the backs of the girls heads again which we will see for 4 seconds. We may make the shot shake a bit here to make it more creepy but until we have experimented with the camera we can't be sure.
90-100 seconds In this section a long shot will show the girls standing in the forest again. It will last for about 3 seconds and will switch to no one standing in the forest for 3 seconds and then it will show the girls standing there again until 100 seconds.
100-110 seconds In this section we will have a close up of the backs of the girls hair and the shot will slightly shake. this will last for about 5 seconds and the music will become quieter until it suddenly switches to an extreme close up shot of the two girls faces where the music will have a loud bang noise and then return to its previous sound. We will see the shot for about 3 seconds then the words 'The Sin' will appear in the middle of the screen which is the title of the film.
110-120 seconds In this section you will see the girls faces and the title both fade out onto a plain blank screen. It will go blank because then the rest of the film would normally continue but because we are only doing the opening sequence, we decided to leave it blank and dark After planning the timing like this, it has given us an idea of how much footage we need to capture to actually create the opening sequence.
When filming we will film more material than needed incase we need to change some of the lengths of the shots e.g turning a 5 second shot into a 3 second shot would make the sequence shorter so another part may need to be made longer to make sure that it meets the marking cryteria by being long enough. We think that the times we have set are realistic and manageable and we think we will have enough time to film all the footage we will need. During the entire sequence there will be no dialogue used at all and the only prop used will be tomato ketchup so that it can be simple but affective.
Font Choice for our main title and credits
To find our font for our credits and main title we went on to www.dafont.com.

This website has loads of different fonts that we could choose from. The fonts were in categories: such as Horror, Gothic, Fancy, Cartoon, Script, Foreign and Simple.




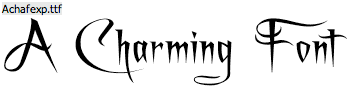
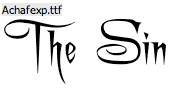
We looked at the appropriate catagories for our thriller, they were horror, distorted and gothic. We looked on these catagories because we thought that it would provide us with the type and styles of font that would fit well with the genre of our thriller film. The ones we chose are:
We choose this font because we thought that it met all of the conventions that we wanted it to meet. This font came from the Horror category. Although we think that this font is good, we believe that it is a little to formal for our main title and credits as the main characters in the movie are teenage girls, so we want to font to portray the girls youngness and immaturity. We also think that the writing looks to gory which is not the look that we are going for as it is a thriller film, so as a group we have decided not to use this font.
We like this font because it is scratchy and easy to read. We got it from the Distorted category. We went onto this category because we thought, our characters are distorted and a bit weird so, we might be able to find a font that would excentuate the characters personalities this would be good. Although we like this font, we have decided that the writing is slightly too normal for our liking. The scratchyness of the font is good, but its not quite weird enough for our 2 minute clip of 'The Sin'.
After we choose this font, we looked at it again and realised that none of us really liked it, so this is a definate no from the whole group. This font came from the distorted category. We don't like it because it would be quite hard to read when the credits are going though. Also we think that it i a bit busy whereas we want our font to be simple bit effective, so that it is noticiable but the main attention is on the action going on in the background. Another problem with it is that it is to all over the place and complicated which is not what we want.
This font is the last out of the four that we have chosen and we have all come to a decision that this is our favorite and the one we should use for our main title and credits. The reasons we have chosen this one is that it is simple enough to not draw to much attention from the view but yet it is not so boring that it does have character. Also, it fits into the movies genre (thriller). We got this font from the gothic category which we weren't expecting to find anything we liked in it, but we did. This font has a slightly medieval feel to it, to begin with we weren't so keen on that because we wanted the font to portray the youngness of the two young teenage girls, but after looking through them all and discussing them with in the group we decided that the older style writing could show and bring out the maturity of what they were doing (there obsession).
Our final Title of the Movie:
Thursday, 4 February 2010
Analysing the credits in 'Panic Room'
How is the style unusual?
The most obvious reason why the credits are unusual is that even though it’s a thriller film, the credits are done in a simple way. All the writing is in capital letters and are in a plain font, making the writing look quite square. The squareness is emphasised by the surrounding buildings all stacked close together. We thought this could also represent the name of the film 'Panic Room' as it is quite a claustrophobic location as the credits follow the angles of the buildings.

How does this reflect the genre or themes of the film?
As we thought it was set up in a claustrophobic way, this represents the actual panic room that is shown throughout the rest of the film because it shows that you can't get out. The writing is quite formal which matches the character of one of the main characters as she is posh and neat.
We think that based on our previous work we used quite boring fonts and backgrounds for our credits so after taking this on board we concentrated quite a lot on how we will show them. We will experiment with creepy lower case fonts to represent the young age of the main characters in the film. In the background of Panic Room it was very light as it was set in the daylight. Despite still using actual action to accompany the credits, ours will be darker to create a spookier feel. We will also use a rural area whereas the location for this film was in a busy city.
Six Feet Under Credit analysis
How is the style unusual?
Some of the credits begin to break apart and deteriorate once they've shown up on the screen, this represents the theme of death and old age frailty. Other credits are at the same angle of objects used during sequence e.g. toe tag, medical liquid and the eye of the dead body.
How does this reflect the genre or themes of the film?
The dead body, funeral and main title of 'Six Feet Under' helps represent the death theme and thriller genre which will revolve around death during the program. The formal writing makes seem more of a mature/formal thriller with less dark and gory themes compared to that of 'Seven'.
Could you use a more creative style such as this?
Yes we could to fit it in with the dark surroundings, however as we are not using any props it would be difficult to change it to different angles, and we would probably used more bold and scary writing to make it suit with the darker themes of our film instead of the formal ones used here.
Six Feet Under, Main Title Sequence
Uploaded by numerof. - Watch original web videos.
Some of the credits begin to break apart and deteriorate once they've shown up on the screen, this represents the theme of death and old age frailty. Other credits are at the same angle of objects used during sequence e.g. toe tag, medical liquid and the eye of the dead body.
How does this reflect the genre or themes of the film?
The dead body, funeral and main title of 'Six Feet Under' helps represent the death theme and thriller genre which will revolve around death during the program. The formal writing makes seem more of a mature/formal thriller with less dark and gory themes compared to that of 'Seven'.
Could you use a more creative style such as this?
Yes we could to fit it in with the dark surroundings, however as we are not using any props it would be difficult to change it to different angles, and we would probably used more bold and scary writing to make it suit with the darker themes of our film instead of the formal ones used here.
Six Feet Under, Main Title Sequence
Uploaded by numerof. - Watch original web videos.
Shot List


We did these shot lists so that when we start filming we have a clear idea of what we need to do and a rough idea of how long it will take. Because it is in sections it will also make it easier to divide the filming up into different lessons. The shot lists contain shot type, action in the shot and extra informations such as locations, props and costumes.
Tuesday, 2 February 2010
Why Thriller's Thrive
Thrillers thrive because they create feelings in us that make us feel in danger and excited even though we are in a safe environment. The things that happen in thriller movies are normal things that happen in real life, but they ave been made more dramatic and disturbing. The most successful type of thrillers where the audience seems to participate the most can cause the audience to relate to and sympathise with the character involved in danger. This can produce an impression of great danger even though there is no danger at all therefore playing tricks on the audience minds.
These films which seem to set blood pounding a lot are very successful.
Thrillers are more successful than horror films because in horror films the content is not directed do an audience and wide as thrillers as they are more scary and they have darker themes, e.g. (exploit sadism, perversion and deformity). The darker themes used do not appeal so much because the public is more healthy minded.
These films which seem to set blood pounding a lot are very successful.
Thrillers are more successful than horror films because in horror films the content is not directed do an audience and wide as thrillers as they are more scary and they have darker themes, e.g. (exploit sadism, perversion and deformity). The darker themes used do not appeal so much because the public is more healthy minded.
Friday, 29 January 2010
Storyboard


We use storyboards to plan out each shot that will be used during our two minute clip, so that when it comes to filming we have a precise plan of what we need to film and can easily have enough time to do it in. The storyboards also make it easy for people to understand the storyline without needing to view it in its completed film version. Storyboards are a rough guidelines to help us not get distracted from the story that we are trying to portray when we are filming. Each frame contain the different information needed for that shot. It will include what the image (what is in the shot), the shot number, type of shot, shot length and what happens in the shot.
Our thriller mise-en-scene
Props: We will not be using any solid props at all during our opening two minutes, this is not conventional of a thriller film. The only object we will be using is ketchup as blood.
Lighting: The lighting will be very dark and gloomy as it is inside the forest and to keep with the dark themes of the film, this is very conventional of any thriller film as it builds up suspense and keeps the audience on the edge.
Setting: The dark forest setting is a typical setting of more psychological and crime thrillers where murders and conflict can take place.
Colour and Costume: The costumes worn by the girls will be very dark and simple with no bright colours at all as the forest setting will be made dark as well, the only other colour is the red of the blood trail and make-up. The contrast between dark and one brighter colour is a typical convention of many darker thrillers.
Make-up: The make up worn by the girls will be red blood and also some black make up on their faces. Also we will edit our eye color to make it red as this will make it more spooky.

Lighting: The lighting will be very dark and gloomy as it is inside the forest and to keep with the dark themes of the film, this is very conventional of any thriller film as it builds up suspense and keeps the audience on the edge.
Setting: The dark forest setting is a typical setting of more psychological and crime thrillers where murders and conflict can take place.
Colour and Costume: The costumes worn by the girls will be very dark and simple with no bright colours at all as the forest setting will be made dark as well, the only other colour is the red of the blood trail and make-up. The contrast between dark and one brighter colour is a typical convention of many darker thrillers.
Make-up: The make up worn by the girls will be red blood and also some black make up on their faces. Also we will edit our eye color to make it red as this will make it more spooky.

Comparing our mise-en-scene use to another thriller such as 'The dark knight'.
Props: The dark knight uses a lot more props than we are going to because they obviously have a lot more funding than we do so they can afford it and also The dark knight is also an actions film whereas our isn't so we don't need all the extra things.
Lighting: Both The dark knight and our 2 minute clip use dark and gloomy lighting to set the scene an make the viewer feel tense.
Setting: the setting we have chosen compared to the dark knight is very different. The dark knight is set in the city where there is a lot going on, but our movie 'The Sin' is set in a rural village where not much happens. We have chosen to film in a forest, there is no filming done in a forest in the dark knight.
Colour and Costume: Our costumes are going to be plain and simple whereas in the dark knight there costumes are formal and more high tech, such as The bat suit. Both films have costumes that are dark colors.


Makeup: Both movies have one/two people who have odd makeup on. In the dark knight the joker has a 'worn off' clowns face paint on his face, in 'the sin' Leah and Ellie will have dark eyes with fake blood on them to make it seem creepy. Ben, like many characters in the dark knight, will have no makeup on , just his natural face.


Editing our ideas before Story boarding
After thinking about our ideas again before drawing up our story boards, we decided that we would not use the idea of Ben being the policeman looking through the pictures but only use the two girls. We decided to do this because after watching our thriller opening sequence, we discovered that not all of the main characters are introduced in the first two minutes but most of the credits and some action is shown. We also thought that it would be more effective if we only used the dark scenes at the beginning rather than keep switching to light and day because it would make it more spooky and it would make it easier for the audience to understand what was happening. Our sequence would obviously be shorted after cutting out Ben's parts so we decided to include more shots of the girls and we are also going to use a picture of the girls that will be edited on photo shop as the very last thing you will see in the two minute clip. This last image will also include the title "The Sin".
Protagonists and Antagonists Compare and Contrast
We will be comparing the protagonists and antagonists from our film to those in Transporter 2. Protagonists: Our protagonist will be a police detective who uses more logic and patience to solve the problems, while Frank (the protagonist in Transporter 2) uses more violence and aggression to solve the problems in his film. They both wear smart clothes through the majority of the films even during more violent scenes.


However they have different reasons for solving the problems of the films, as the police detective will want to solve it as he has an ambitious desire for solving the mystery and protecting the rest of the male population from the antagonists, this reason fits with the conventions of a crime thriller. While in Transporter 2 Frank's reasons for wanting to solve the problem a more a for a character of the opposite who is in peril which drives him forwards. Antagonists: Our antagonists are two sisters who sleep with and then murder teenage boys for revenge and pleasure, typical of a crime thriller. The antagonist in Transporter 2 (Lola) uses guns and violence to prevent Frank from succeeding in his problems, typical of an action thriller. However Lola is under orders from a higher leader (Gianni) while the girls in our film are not under any orders. The girls in our film will wear more simple dark clothes with not much facial emotions, However Lola wears brighter clothes with a lot more emotion. In both films though the antagonists are enemies of male protagonists.

However they have different reasons for solving the problems of the films, as the police detective will want to solve it as he has an ambitious desire for solving the mystery and protecting the rest of the male population from the antagonists, this reason fits with the conventions of a crime thriller. While in Transporter 2 Frank's reasons for wanting to solve the problem a more a for a character of the opposite who is in peril which drives him forwards. Antagonists: Our antagonists are two sisters who sleep with and then murder teenage boys for revenge and pleasure, typical of a crime thriller. The antagonist in Transporter 2 (Lola) uses guns and violence to prevent Frank from succeeding in his problems, typical of an action thriller. However Lola is under orders from a higher leader (Gianni) while the girls in our film are not under any orders. The girls in our film will wear more simple dark clothes with not much facial emotions, However Lola wears brighter clothes with a lot more emotion. In both films though the antagonists are enemies of male protagonists.
Thursday, 28 January 2010
28/01/2010 - Pitch Feedback
We were asked -
- What costumes we would be using?
- Were we going to keep the identity of the girls hidden?
- Who would film?
- How would we make sure it is a thriller and not a horror?
- What would we include in the two minutes?
- The two young girls (Leah and Ellie) would wear black leggings and a plain back top. They would also have dark make-up on to keep with the dark theme of their personalities. The policeman (Ben) would be wearing a formal suit like any other policeman.
- The identity of the girls would not be hidden from the audience but it would be from the other characters in the movie. We are going to do this becasue the audience can see both sides of the murders.
- We would all take it in turns to film depending on who is in the shot. We will make sure that everyone has an equal amount of filming so that it is fair.
- We will make sure that this movie doesn't turn into or get confused with a horror by not show any of the murder, only the consequences. Also, we are going to show the psychological side of the main characters because it allows the audience to relate to their lives in situations that could be familiar rather than constant gory action that you would expect in a horror film.
- We will introduce the main characters, show who the antagonists and protagonist are. We will also have credits and variety of still shots. Our indent will be shown at the beginning of the clip accompanied by music created on Garageband.
Tuesday, 26 January 2010
Evaluating Past Students Work
To get a good understanding of how to make our thriller sequence, we were told to look at and evaluate previous students 2 minute clips. We were given a marking critera that our thriller piece has to live up to. We have to evaluate what effect there 2 minute clip had on the audience.
I looked at a piece by group Q1-11 called 'Blackout'. in my opinion by looking at the mark scheme, this piece wouldnt have recieved high mark because it did have much effect on me as the audience.
There was no music played or any sound at all going on while the 2 minute clip was playing. This might have been because the group had posted it wrong, or it was actually ment to be like that. If it was intentional that they was no sound, it wasnt every effective or good because i had no effect on me and i didnt understand what was going on in the clip becasue there was no sound.
Close to the beginning there is a panning shot, this shows us where the clip is taking place and it familiarises us with the location. This is in most films no matter what the genre is, it is used to show the location. There are many close up shots of peoples faces used in this 2 minute clip. They would be used so the viewer can see the emotion of the character and feel for them when they are watching it. The were mind-shots that showed the location (the room) that the clip takes place in, this has been done to show what the beginning location is at and where the 'action' takes place.
26/01/2010 - Film Pitch
Narrative ideas - Two young girls who are sick in the head who have an obsession with seducing and murdering teenage boys of the same age. The two young girls (who are sisters) will be played by Ellie and Leah and the policeman will be acted by Ben.


Characters\actors ideas - Young policeman who is investigating the case. Two sisters (the murderers). The reason we have chosen these characters is so that we are all part of the 2 minute clip and we all get a chance to film and act. The reason we have chosen two young teenage girls is because we thought that the audience could relate to the normal parts of their life.
Locations Chosen and why - The two girls will be filmed in the forest in college, we have chosen to film here because a forest is seen to be a 'spooky' place. Although we will be filming i the day, we want it to seem to the viewer than it will be at night, so we will use the colour contrast on final cut to edit this. The policeman scenes will be filmed in school in a more formal place but still darkish. We have chosen these locations to make the clip seem more eery and spooky, but the locations used for the policeman would be a working environment so it will allow the audience to familiarise themselves with the locations. The locations also help the viewers to recognise the protagonist and the antagonist.
The certificate will probably be a 15 due to the blood and dark themes involved.
The sub-genre of this film is a crime thriller this is because it will use the crime conventions of: It involves a murder, the characters have ambitious desires for success or recognition (e.g. murdering boys, or solving the crime).
The style of the titles will be handwritten scratch writing with blood running down them to keep with the theme of the film.
The music used will be very recognisable for our indent and then eerie and suspenseful during the rest of the film. A variety of shots will be used as well during the film to keep with the marking criteria.
The only intertextuality we can think of is the policeman part which will be similar to the beginning of "identity".
Friday, 22 January 2010
Our Thriller Ident

We are very pleased with our indent for our made up company 'Thriller Live Assocites'. we chose to make it like this because we agreed that we should do something simple but effective like real companies do.
We chose to name our company Thriller Live Associates because the movie that it would produce would be thrillers and the rest just roles off the tongue and fits in with the theme.
The reason for the big label 'TLA' in the center is so that our label is recognisable to an audience of all ages e.g. Paramount and 20th Century Fox.
Finally the indent will be accompanied by a soundtrack that will be played with the indent in every film that is created. This will be done to make it recognisable, e.g. Warner Brothers Productions.
We used these colours for our ident because the white writing stands out against the navy blue, which we chose rather than having just a plain background because it looks less tacky and more expensive which gives off the impression that our company is very professional and important.
We will be happy to use this as our film production company for are 2:00 minute sequence.
Thriller Ident
 The ident we used is of virtual studios in the beginning of blood diamond. The reason for this is that it is not well known, but yet it is still effective and memberable. The soundtrack accompanying the indent is of the film soundtrack itself which helps the company associate their ident with the film and as it is a popular film, lots of people will watch it and therefore remember it. The signature big V with a door within it is the logo of virtual studios (as you can see above) which comes up before the text comes in so that the audience can associate the logo with the company. Also it doesn't all come in at once, it comes in sections so that it can have more impact and build up suspense.
 lesson: 21st january

In this lesson, we watched a beginning clip of a thriller with no music, we then had to create a soundtrack to go with the clip on Garageband. We found this quite difficult because we had to get the timing right which was difficult to d as there was only one copy of the movie and everyone was trying to use it was the same time. Also, we didn't have enough time to complete our soundtrack, so this made it not as good because the full effect of the clip. When we watched the clip from Identity with the music, our interpretation was quite similar to the original soundtrack.
Now that we have used garage band for a thriller film we will have a better idea of what sounds we will need for our own thriller as we have already tested some of them out.
Thursday, 21 January 2010
Sounds Terms
Diegetic -
- we see the source of the sound
- dialogue - tone of voice/accent/phrases
- back ground noise e.g. TV/radio
- ambient sound - natural sounds
- sound that is added in
- sound effects
- soundtrack - character motifs (Jaws)
- sound that is a contrast/contradicting the images (face off)
- Smooths the gap between scenes.
Tuesday, 19 January 2010
Evaluating Past Students
They have managed to meet the marking criteria of:
Holding a shot steady
Shooting material appropriate to the task set, e.g. the dark settings and more mature objects and themes used such a blood and weapons.
Selecting mise-en-scene e.g. dark settings, thriller make up used (blood), dark soundtrack.
Using varied shot transitions/effects, e.g. the hand written titles that go in and out of focus so it looks like they're shaking.
Using sound with images e.g. the broken sound used every time the titles are used without action.
Using titles appropriately e.g. the shaking titles are used either on a complete black background or over not so important action.
Framing a shot, excluding or including as appropriate e.g. the close ups of blood, weapons and photographs.
All of these help make this video sucessful at attracting the audience and portraying the thriller genre, if i was to improve this video i would use a larger variety of shots which would help them achieve more of the marking criteria.
Marking criteria for video
Level 4 (highest level) - 48+/60
Demonstrate excellence in the following to gain a level 4 for video:
- holding a shot steady
- framing s hot - excluding/including elements as appropriate
- using a variety of shit distances
- shooting material appropriate to the task set
- selecting mis en scene
- editing so that meaning is apparent to the viewer
- using varied shot transitions/effects
- using sound with images
- using titles appropriately
Other criteria you must include:
- be able to see the setting or location
- music should indicate the genre
- themes of your film and narrative structure should be clear
Demonstrate excellence in the following to gain a level 4 for video:
- holding a shot steady
- framing s hot - excluding/including elements as appropriate
- using a variety of shit distances
- shooting material appropriate to the task set
- selecting mis en scene
- editing so that meaning is apparent to the viewer
- using varied shot transitions/effects
- using sound with images
- using titles appropriately
Other criteria you must include:
- be able to see the setting or location
- music should indicate the genre
- themes of your film and narrative structure should be clear
Monday, 18 January 2010
The Matrix - micro elements
How do Micro Elements creating meaning in the clip?
The film opens with a close up of the main character which shows the concentration on his face for what he is currently doing. It also shows that they have used a stereotypical good looking young man as the main character. This begins to pan out to show us his surroundings and other characters so that the audience can become familiar with these. It also uses a mixture of close up shots to introduce other characters but still has the other characters in the background rather than just focusing on one person.
The lighting used throughout the entire opening sequence is dark. The room is lit by low lighting and the machinery that they are using. This makes the setting feel more personal and allows the audience to feel slight suspense rather if they had used bright lighting, they would feel happy and safe.
The costumes they use are basic clothes that resembles a uniform. All the characters are wearing similar clothes but in different ways which can show their personality and their character. For example the older man has neat tidy clothes on which shows how superior he is compared to some of the other men that are wearing dirty vests with overalls.
The sound used is mostly dialogue. The characters have American accents but the man that is the one with power, speaks in a more formal tone to the rest of the characters. They use quiet, slow background music throughout the clip which isn't very noticeable until the end when it suddenly stops and a loud noise is made to show something bad has happens and it creates suspense. It also matches what is happening in the clip because we see the shock on the characters faces.
Conventions in a Thriller
What conventions would you expect to find in a thriller?
Narrative:
Thriller films are normally shown from two characters points of view, usually the main characters. They are most commonly shown through the villian or the victim. By having the tory shown through the villans mind, it can create sympathy for them and allows the audince to maybe see a different side to the story. Another way the story can be told is through an onlooker which allows the audience to experience the events which would make them be more observant towards the characters and the storyline.
Characters:
The typical characters you would expect to find in a thriller film are a villan and a hero. These two characters would normally be the main chyaracters that are played off against eachother throughout the thriller. You may also have other weak characters around the victim that could also be picked on by the villan to emphasize the power he has over everyone. Another character you would expect to find is the good citizen, the person that is trying to help the victim eg policeman.
Props:
Props that could be used for a thriller film are obvious weapons like guns, knives etc as they create the feeling of danger.
Sets:
Sets that you would find in a thriller scene are normal every day sets to familiarise the audience with the characterssurroundings eg streets. It also allows the character to identify when they are in an unknown place which shows that something is about to go wrong. These sets could be anywhere, but dark and dirty places are often used when something bad has happens which creates a bit of a horror feel to the film.
Narrative:
Thriller films are normally shown from two characters points of view, usually the main characters. They are most commonly shown through the villian or the victim. By having the tory shown through the villans mind, it can create sympathy for them and allows the audince to maybe see a different side to the story. Another way the story can be told is through an onlooker which allows the audience to experience the events which would make them be more observant towards the characters and the storyline.
Characters:
The typical characters you would expect to find in a thriller film are a villan and a hero. These two characters would normally be the main chyaracters that are played off against eachother throughout the thriller. You may also have other weak characters around the victim that could also be picked on by the villan to emphasize the power he has over everyone. Another character you would expect to find is the good citizen, the person that is trying to help the victim eg policeman.
Props:
Props that could be used for a thriller film are obvious weapons like guns, knives etc as they create the feeling of danger.
Sets:
Sets that you would find in a thriller scene are normal every day sets to familiarise the audience with the characterssurroundings eg streets. It also allows the character to identify when they are in an unknown place which shows that something is about to go wrong. These sets could be anywhere, but dark and dirty places are often used when something bad has happens which creates a bit of a horror feel to the film.
Subscribe to:
Posts (Atom)