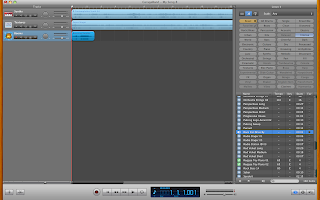
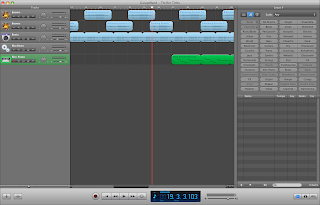
 For the last 10 minutes of this lesson we tried to narrow down sounds that we wanted to use in our 2 minute clip. We found three sounds that we would like to use in our clip. One of them is for our indent, one is for a climax and the last one is for a tune that would play throught the whole thing. The reason we have chosen these three sounds is because they all fit into what we wented our clip to sound like. As the clip gets futher on, the pace quickens and we want our soundtrack to reflect that. Throughtout the two minute clip there are going to be flashing images if we can get it to look right on final cut, when this happens we want to music to be obviouly different when they come up, we were thinking maybe a bit of music that would be slightly jumpy.
Friday, 26 February 2010
Garage Band Soundtrack
 For the last 10 minutes of this lesson we tried to narrow down sounds that we wanted to use in our 2 minute clip. We found three sounds that we would like to use in our clip. One of them is for our indent, one is for a climax and the last one is for a tune that would play throught the whole thing. The reason we have chosen these three sounds is because they all fit into what we wented our clip to sound like. As the clip gets futher on, the pace quickens and we want our soundtrack to reflect that. Throughtout the two minute clip there are going to be flashing images if we can get it to look right on final cut, when this happens we want to music to be obviouly different when they come up, we were thinking maybe a bit of music that would be slightly jumpy.
Unedited film footage 25/03/10
We filmed this on the 25th February, which was our first filming lesson, so we took a lot of shots that we don't know if we'll use yet. Everything that we filmed went well and looked how we wanted it to look, except for the trail. Obviously we will edit the colorings in the footage in final cut to make it look like it was filmed at night. Also we will edit the color of the blood (ketchup) to make it more obvious and apparent that it is there. The costumes weren't a problem because we planned to wear the clothes we needed to wear for the film that day. When we edit the clip the sound from it will be replaced by our soundtrack which will be made on garage band.
This piece of filming was done on the 26th of February and we were initially planning to film on this date but because we weren't happy with all of the filming we did the previous lesson, we re-did the bit we didn't like, which was the 'blood' trail. We didn't like it the first time becasue it wasn't long enough, the filming was at a consistent height or speed and we thought that we could make it more to what we wanted if we re-did it. The filming was done in exactly the same location to keep consistency.
26th February
1st filming lesson - 25th February


 These images were taken yesterday when we were doing our filming, we had to put ketchup on our faces to make it look like blood, this took a while because there we quite a lot of complications with doing this because the ketchup when everywhere and we had to get it right first time as we didn't have as much ketchup as we wanted so we couldnt be wasteful.
The ketchup trail we did in this lesson didnt go as well as we wanted as we decided as a group that it was done to think, so next time we film, we will redo the 'blood' trail.
Tuesday, 23 February 2010
Practice on Garage band
 We went onto garage band to practice using it and we wanted to find the different sounds we needed for our 2 minute thriller clip. We tried to see if a soundtrack could be created without using traditional instruments. We found that there are many different sound that could fit into our thriller film so it was helpful for when we come to create our soundtrack, we have narrowed down what categories we want to look at. A couple of the categories we are looking to use are 'dark' and 'Intense'.
Female villains

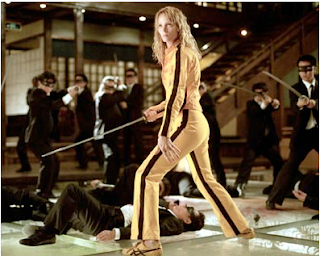
We decided to look at female villains because the main characters in our thriller clip are female. The one we chose to look at in detail was Uma Thurman in Kill Bill as it is a well known film. We thought that it would be a good idea to look at this film because although she does bad things, she does them for a reason and in our clip, you could find out later in the film that the two girls are also doing it for a reason.
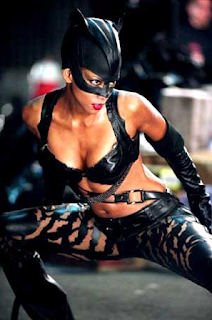
 We also looked at Catwoman. Eventhough she is also nothing like our female villains, she still plays the strong role of the villain. She gets possessed by a cat which turns her into the villain whereas the villains in our clip are just sick in the head. The film revolves around what she does which is similar to our film.
Filming call Sheet
Ben will pick up and bring back the camera and tripod as he is filming.
We will be filming in the forest in the outskirts of the school which is in walking distance from our classroom, and it is not a public location. We have chosen this location because it is rural and quiet enough to suit the thriller setting conventions and the lighting won't matter so much as we will make it darker in final cut.
We will be filming during the day and then making the setting darker in final cut.
Ellie and Leah need to be there for the acting as they play the two girls but as there is no dialogue they do not need to learn a script.
Ben will do all of the filming throughout the film time.
The only prop needed is tomato ketchup for the blood which we can all bring.
Our back up plan for if weather disrupts our filming is to work on soundtrack and editing from the footage we already have. During our filming time we are going to capture the first two minutes of the film. We will cover a wide range of shots and we don't need to cover any sound as the soundtrack will be playing over it the entire time.
Thursday, 11 February 2010
11th February - Second filming lesson
Photos of what we want in our two minute sequence
Thriller test footge.
This footage was filmed on Tuesday afternoon and are all practice shots for our final piece. The purpose of this test footage is to see how long it would take to shoot each shot type and what the best locations for them are. We feel that these shots were successful as we managed to keep the camera steady throughout and they showed off the thriller element well. What we should be aware of: 1. Establishing long shot: make sure the camera is steady and can clearly portray the movement of the girls. 2. Close up floor tracking shot: make sure that the blood trail is easily seen during the shot and that it is the main part of the shot. 3. Ascending tracking shot: make sure that the camera doesn't shake when ascending up the girl's bodies so that the upward transition from the ground to them is smooth. We used these shots as they are probably the most difficult to shoot and so we needed the practice to get them as steady and smooth as possible. Also they show the different range of shots that will be used during our final product and we can get some experience of shooting in the forest.
Tuesday, 9 February 2010
Health and Safety when filming
Health and Safety-
- Be aware of your surroundings
- Get consent
- Don't do anything that a passer by might be offended by
- Be respectful to the public
- Don't film in a dangerous place
- No swearing/children can appear in the film
- You cannot go on the roof of the college
Top Tips for filming
Top tips-
- Lots of shots
- Have a back up plan
- Make sure you film more than you need
- Make sure the tape is in the correct place
- Be clear on what you want to film
- Use your shot lists
- Keep continuity
- Keep your camera steady
Friday, 5 February 2010
Breakdown of our Finalised Ideas
0-10 seconds 5 seconds of this will be our ident with its own music playing in the background. The ident will fade into darkness and the music will fade into the music we will be using for our background music throughout the clip. You will see the floor in the forest for about 3 seconds after the ident has faded out.
10-20 seconds In this section you will see the beginning of the blood trail on the floor and the eerie music has now got a little louder to build up suspense. We will be following the blood for the whole ten seconds along the forst floor. During the 14-20 seconds section, the first credit will appear which will be 'Leah Clark' which will be shown for 3 seconds, then 'Ellie Farrington' will appear afterwards for 3 seconds as well. We will have used tomato ketchup to create the blood for this and our location will be the forest. We will use a tracking shot that slowly starts to zoom in at 15 seconds.
20-30 seconds In this section we will still be using a tracking shot of the blood trail on the floor in the forest, but more credits will be appearing. These will be: 'Produced by Ellie Farrington Leah Clark Ben Whybrow' 'Directed by Ellie Farrington Leah Clark Ben Whybrow' 'Music by Ellie Farrington Leah Clark Ben Whybrow' They will all last for about 3 seconds each. The music will be increasing in volume throughout this period and reaching its full volume by the end of this period.
30-40 seconds In this section we will be using a tracking shot again, filming the blood trail but at 33 seconds you will start to see one each of the girls feet walking along. The girls will be walking through the forest with blood (tomato ketchup) on their feet. They will be wearing black leggins with no shoes. We will still be seeing credits, these will be: 'Editing by Ellie Farrington Leah Clark Ben Whybrow' 'Filming by Ellie Farrington Leah Clark Ben Whybrow' 'Lighting by Ellie Farrington Leah Clark Ben Whybrow' The music will remain at the same pace before becoming more intensive as it reaches the girl's feet.
40-50 seconds In this section we will still be in the forest but there will be no credits now. We will still be using tomato ketchup on the girls feet and on the ground where it has dripped from their hands but the shot will slowly begin to pan up and out so you can see both of the girls feet and you can see part of their legs walking along now. The music will have been playing throughout all this time, gradually becoming more intensive.
50-60 seconds The shot continues to pan up so that you can now see the girls lower backs and you can see that they are holding hands. It will be visible that there is blood (tomato ketchup) on the hands and arms and it will be dripping from them which is where the blood trail has come from. After about 5 seconds, you will begin to see the backs of the girls heads. They will still be walking along in the forest.The music will still be increasing in intensity.
60-70 seconds In this section the shot will switch to a close up of the girls hands with the blood on. It will last for about 4 seconds and then it will zoom out to a long shot of the girls standing still in the middle of the forest. The shot will shake a little to make it more spooky and you will be able to slightly see the blood trail (tomato ketchup). One of the girls will slowly turn her head to look behind her at the camera and will stay in that position until 70 seconds. Along with the soundtrack, extra sound effects will be used during the shaking of the camera to add suspense.
70-80 seconds In this section the shot will switch back to the back of the girls heads, you won't see lower than their shoulders. The forest around will be quite dark still. After 4 seconds of seeing their heads, the girls will both turn their heads, one completely to the side and one only halfway sidewards. You will see blood splattered on only one face, this shot will last for 6 seconds.
80-90 seconds In this section the shot will flash to the same as before but the other girls head will now be fully turned and she will have blood (tomato ketchup) splattered on her face and the other girls face will be clean. This will last for 6 seconds and will switch to a medium close up of the backs of the girls heads again which we will see for 4 seconds. We may make the shot shake a bit here to make it more creepy but until we have experimented with the camera we can't be sure.
90-100 seconds In this section a long shot will show the girls standing in the forest again. It will last for about 3 seconds and will switch to no one standing in the forest for 3 seconds and then it will show the girls standing there again until 100 seconds.
100-110 seconds In this section we will have a close up of the backs of the girls hair and the shot will slightly shake. this will last for about 5 seconds and the music will become quieter until it suddenly switches to an extreme close up shot of the two girls faces where the music will have a loud bang noise and then return to its previous sound. We will see the shot for about 3 seconds then the words 'The Sin' will appear in the middle of the screen which is the title of the film.
110-120 seconds In this section you will see the girls faces and the title both fade out onto a plain blank screen. It will go blank because then the rest of the film would normally continue but because we are only doing the opening sequence, we decided to leave it blank and dark After planning the timing like this, it has given us an idea of how much footage we need to capture to actually create the opening sequence.
When filming we will film more material than needed incase we need to change some of the lengths of the shots e.g turning a 5 second shot into a 3 second shot would make the sequence shorter so another part may need to be made longer to make sure that it meets the marking cryteria by being long enough. We think that the times we have set are realistic and manageable and we think we will have enough time to film all the footage we will need. During the entire sequence there will be no dialogue used at all and the only prop used will be tomato ketchup so that it can be simple but affective.
Font Choice for our main title and credits


Thursday, 4 February 2010
Analysing the credits in 'Panic Room'
How is the style unusual?
The most obvious reason why the credits are unusual is that even though it’s a thriller film, the credits are done in a simple way. All the writing is in capital letters and are in a plain font, making the writing look quite square. The squareness is emphasised by the surrounding buildings all stacked close together. We thought this could also represent the name of the film 'Panic Room' as it is quite a claustrophobic location as the credits follow the angles of the buildings.

How does this reflect the genre or themes of the film?
As we thought it was set up in a claustrophobic way, this represents the actual panic room that is shown throughout the rest of the film because it shows that you can't get out. The writing is quite formal which matches the character of one of the main characters as she is posh and neat.
We think that based on our previous work we used quite boring fonts and backgrounds for our credits so after taking this on board we concentrated quite a lot on how we will show them. We will experiment with creepy lower case fonts to represent the young age of the main characters in the film. In the background of Panic Room it was very light as it was set in the daylight. Despite still using actual action to accompany the credits, ours will be darker to create a spookier feel. We will also use a rural area whereas the location for this film was in a busy city.
Six Feet Under Credit analysis
Some of the credits begin to break apart and deteriorate once they've shown up on the screen, this represents the theme of death and old age frailty. Other credits are at the same angle of objects used during sequence e.g. toe tag, medical liquid and the eye of the dead body.
How does this reflect the genre or themes of the film?
The dead body, funeral and main title of 'Six Feet Under' helps represent the death theme and thriller genre which will revolve around death during the program. The formal writing makes seem more of a mature/formal thriller with less dark and gory themes compared to that of 'Seven'.
Could you use a more creative style such as this?
Yes we could to fit it in with the dark surroundings, however as we are not using any props it would be difficult to change it to different angles, and we would probably used more bold and scary writing to make it suit with the darker themes of our film instead of the formal ones used here.
Six Feet Under, Main Title Sequence
Uploaded by numerof. - Watch original web videos.
Shot List


Tuesday, 2 February 2010
Why Thriller's Thrive
These films which seem to set blood pounding a lot are very successful.
Thrillers are more successful than horror films because in horror films the content is not directed do an audience and wide as thrillers as they are more scary and they have darker themes, e.g. (exploit sadism, perversion and deformity). The darker themes used do not appeal so much because the public is more healthy minded.


